Documentation -- Offensive Playbooks
The first step when determining which play you will run is determining which players will be involved in the play. The top section on the right hand side of your offensive playbook (titled Offensive package options) will allow you to do this. You will see around 20 different packages of players you can use on a play (avoid using the Kicking and Punting packages unless you plan to actually kick or punt the ball). These are the players you have defined to play in each package using the "Set Offense" option.
Obviously, you want to present different looks against a defense in similar situations. You can do this by giving a weight to how often you want to run out of each package. Beside the weights is a percentage that shows how often each package will be run. The higher the weight, the more often you will use a particular player package. It may sound confusing, but it's actually pretty easy once you get the hang of it. Here's an example :
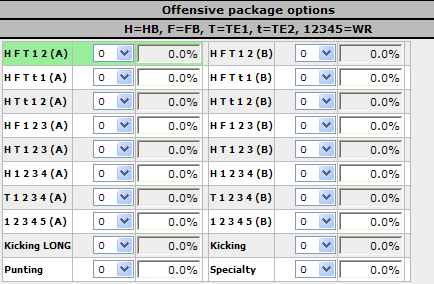
Before giving a weight to any package, you see that each package is listed at 0%.
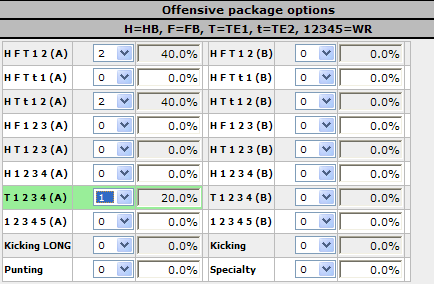
Now, lets give a weight of 2 to out H F T 1 2 (A) package. Doing so means, if we stopped now, we would call this package 100% of the time in this scenario.

Let's say we want to run some plays out of the H T t 1 2 (A) package as well. If we wanted to split the percentages 50% / 50% between the 2 packages, we would give this package a weight of 2 also.

As you can see, both are rated now at 50%. That is because the weight is evenly distributed between the 2 packages. Lets say we want to run package T 1 2 3 4 (A) as well, but only very rarely. Setting the weight to 1 doesn't really do what we want; it calls T 1 2 3 4 (A) 20% of the time, while calling H T F 1 2 (A) and H T t 1 2 (A) each 40% of the time.
That is because we have distributed 5 "weights", and the 1 "weight" T 1 2 3 4 (A) has accounts for 20% of that total (hence, it will be called 20% of the time). The thing to not is that you can distribute as many "weights" as you like, as they do NOT increase the likelihood of a scenario being called. Instead they increase the likelihood of a package being chosen once a scenario is decided upon. Let's say that, instead of 20%, we want the T 1 2 3 4 (A) to be called roughly 10% of the time, splitting the other 2 evenly. One way to get close to this number would be to increase the other weights until we get close to the percentage we like. Increasing the weights of the other 2 packages to 4 gets us close, but not quite far enough. Increasing them both to 5 increases things a bit too much.
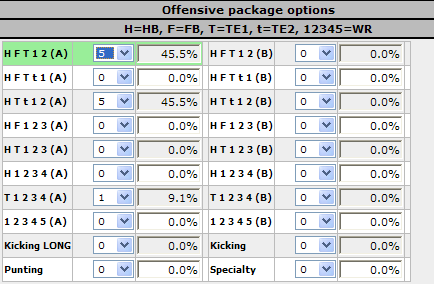
If you want to get the T 1 2 3 4 5 closer to 10%, it requires a bit of tinkering, or a bit of algebra. One way to accomplish it without breaking out the pencil and paper is to double the weight of all packages and then backing the other packages down. For instance, if we doubled all of the weights in out previous example (to 2, 10, and 10), our percentages initially stay the same (as, percentage wise, the weights are still identical).
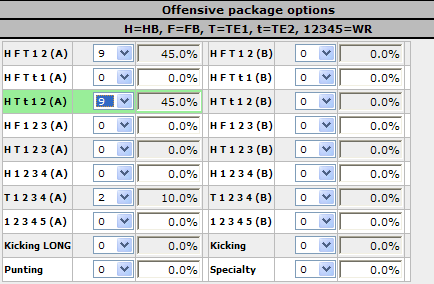
Now, if we back down the percentages on the H T F 1 2 (A) and H T t 1 2 (A) packages to 9... voila! We now have the T 1 2 3 4 package being called 10% of the time, and the other packages being called 45% of the time each.
It may be impossible to get an exact percentage, but it is possible to get awfully close (within tenths of a percentage point) to just about any percentage grouping you'd like.
After selecting the percentages you wish to use certain player packages, you will select at which percentages you would like to run each eligible formation.
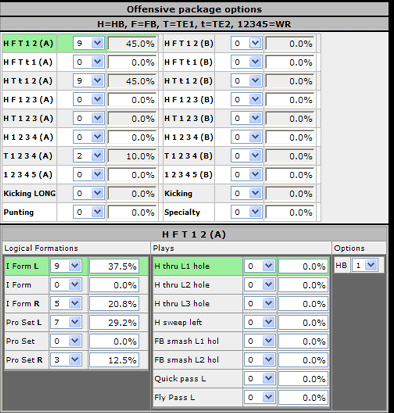
First, start by selecting the package you would like to distribute formation weights for. You can do this by directly clicking on the name of the package. The box should turn a lime green color. We will start by clicking on the H F T 1 2 (A) package. The package name, the logical formations for this package, and the plays available for each of these formations will be shown in the section directly below your Offensive package options.

Let's assume that, when we run this package, we want to run from an I formation a bit more often than a Pro Set, and prefer plays going to the left side of the field a little more often than to the right side of the field. You can set your formation weights to reflect this preference.
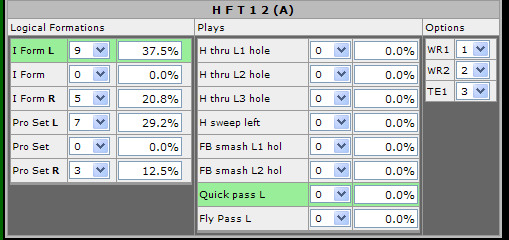
After setting the weights for each formation, you will need to select what percentage to run which plays available within the formation. First, click on the formation you wish to set the percentages for (again, the formation will turn lime green). This will show you a list of plays available when running this particular formation. Setting your play percentages within a formation is done the same way as setting your Package percentages within a scenario or your formation percentages within a package. But how do you know what a play consists of and, if a play is a pass play, how do you know the QB's reads (the order he is looking for each receiver)? Good news! When you click on a play (again, it will turn lime green) , the play's diagnostics will appear on the field directly below the play options. To demonstrate, let's click on "Quick Pass L", which is one of the options under your "I form L" formation. Both boxes should be lime green.
What you will see initially is the formation. The formation for many of the plays will look identical. You can click on the dropdown box that says "Formation", and change it to "Presnap." This may or may not look different than than when you had "Formation" selected. "Presnap" will show you if any players are going "in motion" during the play. Finally, you can select "Aftersnap." This will show you the blocking assignments and routes of the players involved in the play. A straight line signifies blocking assignments. Routes will either be signified by a "dot" (which means the player is running to a spot) or an arrow (which means the player is running downfield and would be targeted while being in motion). In this play, your WR1 would run 3 yards past the line of scrimmage and stop to look for a quick pass. Your TE1 would run up 3 yards past the line of scrimmage and go half way across the field and stop to look for a pass. Your WR2 would go 7 yards past the line of scrimmage and go towards the center of the field slightly and stop to look for a pass.

After looking at the diagnostics of the play, you will need to decide which receiver you want to be your primary receiver, secondary receiver, etc. You do this with "options" column beside the "Plays" column. All receivers looking to receive the ball are listed here. If you do not wish for one of the receivers to catch the ball (and simply act as a decoy), set his options box to 0. Otherwise, list the receivers in order of preference. It is suggested to list the receivers either "left-to-right" or "right to left", as your quarterback reading the receivers based on the order you select. In other words, if you listed your WR1 as 1, WR2 as 2, and TE1 as 3 in this example (the default), your quarterback would start his reads left, go far to the right, and then look at the center of the field. This would be inefficient, and would obviously take more (possibly too much) time than if the QB looked for his receivers in a uniform direction. Also, as a side note, if you list 2 receivers with the same priority, half the time the QB will look for one receiver before looking to the other, the other half of the time he will look for the other receiver first. This would cause confusion for most plays but, in this example, if we set the TE1 priority to 0 and the WR1 and WR2 priorities both to 1, this would be quite appropriate.
A few things to note on pass plays :
Even if a player is in to block on a pass play, its possible the QB may try to dump a pass off to them to avoid being sacked.
The further down the reads a play that has an arrow appears (the player is in stride), the likelihood of the pass being made further down the field increases.
A few notes on running plays :
You will notice that there is always only one choice as to which player runs the ball
The plays are named with a gap (ie : FB Smash L2 Hole). The gap defined is shown at the bottom of the screen. L means left, R means right. The 1 gap is between the center and guard, the 2 gap is between the guard an tackle, etc. You can also see where the handoff takes play; a white line from the QB meets the yellow line of the runner at this point.
So, to recap:
Easy, huh?
When you are finished setting all of the package, formation, play, and player priority information in a scenario, remember to confirm the scenario! Also, remember to save the playbook when you are done!
Obviously, you want to present different looks against a defense in similar situations. You can do this by giving a weight to how often you want to run out of each package. Beside the weights is a percentage that shows how often each package will be run. The higher the weight, the more often you will use a particular player package. It may sound confusing, but it's actually pretty easy once you get the hang of it. Here's an example :
Before giving a weight to any package, you see that each package is listed at 0%.
Now, lets give a weight of 2 to out H F T 1 2 (A) package. Doing so means, if we stopped now, we would call this package 100% of the time in this scenario.
Let's say we want to run some plays out of the H T t 1 2 (A) package as well. If we wanted to split the percentages 50% / 50% between the 2 packages, we would give this package a weight of 2 also.
As you can see, both are rated now at 50%. That is because the weight is evenly distributed between the 2 packages. Lets say we want to run package T 1 2 3 4 (A) as well, but only very rarely. Setting the weight to 1 doesn't really do what we want; it calls T 1 2 3 4 (A) 20% of the time, while calling H T F 1 2 (A) and H T t 1 2 (A) each 40% of the time.
That is because we have distributed 5 "weights", and the 1 "weight" T 1 2 3 4 (A) has accounts for 20% of that total (hence, it will be called 20% of the time). The thing to not is that you can distribute as many "weights" as you like, as they do NOT increase the likelihood of a scenario being called. Instead they increase the likelihood of a package being chosen once a scenario is decided upon. Let's say that, instead of 20%, we want the T 1 2 3 4 (A) to be called roughly 10% of the time, splitting the other 2 evenly. One way to get close to this number would be to increase the other weights until we get close to the percentage we like. Increasing the weights of the other 2 packages to 4 gets us close, but not quite far enough. Increasing them both to 5 increases things a bit too much.
If you want to get the T 1 2 3 4 5 closer to 10%, it requires a bit of tinkering, or a bit of algebra. One way to accomplish it without breaking out the pencil and paper is to double the weight of all packages and then backing the other packages down. For instance, if we doubled all of the weights in out previous example (to 2, 10, and 10), our percentages initially stay the same (as, percentage wise, the weights are still identical).
Now, if we back down the percentages on the H T F 1 2 (A) and H T t 1 2 (A) packages to 9... voila! We now have the T 1 2 3 4 package being called 10% of the time, and the other packages being called 45% of the time each.
It may be impossible to get an exact percentage, but it is possible to get awfully close (within tenths of a percentage point) to just about any percentage grouping you'd like.
After selecting the percentages you wish to use certain player packages, you will select at which percentages you would like to run each eligible formation.
First, start by selecting the package you would like to distribute formation weights for. You can do this by directly clicking on the name of the package. The box should turn a lime green color. We will start by clicking on the H F T 1 2 (A) package. The package name, the logical formations for this package, and the plays available for each of these formations will be shown in the section directly below your Offensive package options.
Let's assume that, when we run this package, we want to run from an I formation a bit more often than a Pro Set, and prefer plays going to the left side of the field a little more often than to the right side of the field. You can set your formation weights to reflect this preference.
After setting the weights for each formation, you will need to select what percentage to run which plays available within the formation. First, click on the formation you wish to set the percentages for (again, the formation will turn lime green). This will show you a list of plays available when running this particular formation. Setting your play percentages within a formation is done the same way as setting your Package percentages within a scenario or your formation percentages within a package. But how do you know what a play consists of and, if a play is a pass play, how do you know the QB's reads (the order he is looking for each receiver)? Good news! When you click on a play (again, it will turn lime green) , the play's diagnostics will appear on the field directly below the play options. To demonstrate, let's click on "Quick Pass L", which is one of the options under your "I form L" formation. Both boxes should be lime green.
What you will see initially is the formation. The formation for many of the plays will look identical. You can click on the dropdown box that says "Formation", and change it to "Presnap." This may or may not look different than than when you had "Formation" selected. "Presnap" will show you if any players are going "in motion" during the play. Finally, you can select "Aftersnap." This will show you the blocking assignments and routes of the players involved in the play. A straight line signifies blocking assignments. Routes will either be signified by a "dot" (which means the player is running to a spot) or an arrow (which means the player is running downfield and would be targeted while being in motion). In this play, your WR1 would run 3 yards past the line of scrimmage and stop to look for a quick pass. Your TE1 would run up 3 yards past the line of scrimmage and go half way across the field and stop to look for a pass. Your WR2 would go 7 yards past the line of scrimmage and go towards the center of the field slightly and stop to look for a pass.
After looking at the diagnostics of the play, you will need to decide which receiver you want to be your primary receiver, secondary receiver, etc. You do this with "options" column beside the "Plays" column. All receivers looking to receive the ball are listed here. If you do not wish for one of the receivers to catch the ball (and simply act as a decoy), set his options box to 0. Otherwise, list the receivers in order of preference. It is suggested to list the receivers either "left-to-right" or "right to left", as your quarterback reading the receivers based on the order you select. In other words, if you listed your WR1 as 1, WR2 as 2, and TE1 as 3 in this example (the default), your quarterback would start his reads left, go far to the right, and then look at the center of the field. This would be inefficient, and would obviously take more (possibly too much) time than if the QB looked for his receivers in a uniform direction. Also, as a side note, if you list 2 receivers with the same priority, half the time the QB will look for one receiver before looking to the other, the other half of the time he will look for the other receiver first. This would cause confusion for most plays but, in this example, if we set the TE1 priority to 0 and the WR1 and WR2 priorities both to 1, this would be quite appropriate.
A few things to note on pass plays :
Even if a player is in to block on a pass play, its possible the QB may try to dump a pass off to them to avoid being sacked.
The further down the reads a play that has an arrow appears (the player is in stride), the likelihood of the pass being made further down the field increases.
A few notes on running plays :
You will notice that there is always only one choice as to which player runs the ball
The plays are named with a gap (ie : FB Smash L2 Hole). The gap defined is shown at the bottom of the screen. L means left, R means right. The 1 gap is between the center and guard, the 2 gap is between the guard an tackle, etc. You can also see where the handoff takes play; a white line from the QB meets the yellow line of the runner at this point.
So, to recap:
- Create a scenario
- Decide if you are wanting to attempt to call a timout, spike the ball
- For each Scenario, decide which Packages you want to operate out of and at what percentages
- For each Package, decide which Formation you want to work out of and at what percentages
- For each Formation, determine at what percentages you want to call each play
- For pass plays, determine the order you want your QB to read the receivers
Easy, huh?
When you are finished setting all of the package, formation, play, and player priority information in a scenario, remember to confirm the scenario! Also, remember to save the playbook when you are done!