Documentation -- Defensive Playbooks
Setting your defensive playbook is a bit easier to comprehend now that you understand how to set your scenarios. You will set your scenario selections for your defensive playbook the same way you set your offensive scenarios. Once you do so, you are ready to select which defensive packages you want to run depending on the offensive package your opponent chooses.
In this example, we are going to focus on what defensive package we want to play when our opponent comes out with an H F T t 1 package. By clicking on the drop down box of packages, we see the different defensive packages available. My guess is that, if a team is bringing in a two tight-end set, they'll likely run the ball. For this reason, I am going to counter with my "4-4-3 Eight in the Box" defense.
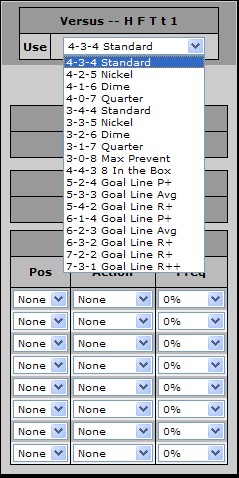
NOTE : if your opponent uses players out of position (ie : putting a TE at WR), the game will attempt to adjust for it. So even though the package they use is H F T 1 2, if they put a tight end in at WR2, your defense will most likely defend using the H F T t 1 package.
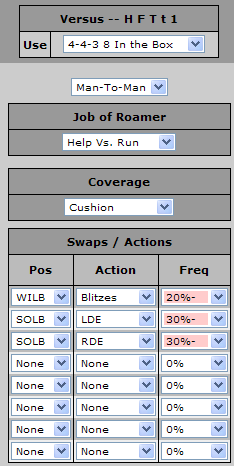
After selecting this defense, I must first select what sort of coverage we will play. As I am expecting a run, I will play a Man-to-Man defense, and my roamer (the person without a specific man assignment - in this case, my WILB) will help versus the run.
Although I don't expect a pass, I will play a Cushion coverage off the line of scrimmage versus the eligible receivers just incase.
Swaps / Actions :
There will be instance you will want to change things up (ie : blitz a player, drop a lineman into coverage, stunt a DE and a DT to try and cause confusion, etc). You can accomplish this under the "Swaps / Actions" section.
In this example, lets say we want our WILB to blitz 20% of the time. When the WILB isn't blitzing, we want to bring the SOLB in on the rush and drop our DE into coverage 30% of the time. How would we accomplish that?
Under the "Stunts / Actions" section, select your WILB under Pos, select Blitz under Action, and select 20%- (colored pink) under Freq. (I'll explain the difference between 20%+ and 20%- in a minute)
Under the next box, choose SOLB, LDE, and 30%-
Under the next box, choose SOLB, RDE, and 30%-
What does 20%- mean? That means to perform the action (in this case, blitzing the WILB) 20% of the time. If you perform this, then perform no other actions after this one. If, however, the game does not perform this action (it won't 80% of the time), it can continue seeing if it will perform another "Stunt / Action." If, however, you still want to open the possibility for the other actions regardless of whether or not you blitz, you would select 20%+ (the uncolored one).
Why did we select both the SOLB to switch with the LDE and the RDE? If the SOLB is no lined up on the side of the LDE, then this swap will be ignored. In that case, it would move to the next "Swap / Action", which tells the SOLB to try and swap with the RDE instead.
Note : If you select 20%- in our example, the second action will actually only be performed 80% (the percent the blitz isn't called) * 30% = 24% (while the blitz will occur 20% of the time and no call will occur 100% - (20% + 24%) = 56% of the time). If you select 20%+, the second action will be called 30% of the time. The individual breakdown would be :
Blitz WILB + no other Action : = (20%) * (100% - 30%) = 14%
No Blitz + Secondary Action = (80%) * (30%) = 24%
Blitz WILB + Secondary Action = (20%) * (30%) = 6%
No Actions = (100% - 20%) * (100% * 30%) = 56%
In this example, we are going to focus on what defensive package we want to play when our opponent comes out with an H F T t 1 package. By clicking on the drop down box of packages, we see the different defensive packages available. My guess is that, if a team is bringing in a two tight-end set, they'll likely run the ball. For this reason, I am going to counter with my "4-4-3 Eight in the Box" defense.
NOTE : if your opponent uses players out of position (ie : putting a TE at WR), the game will attempt to adjust for it. So even though the package they use is H F T 1 2, if they put a tight end in at WR2, your defense will most likely defend using the H F T t 1 package.
After selecting this defense, I must first select what sort of coverage we will play. As I am expecting a run, I will play a Man-to-Man defense, and my roamer (the person without a specific man assignment - in this case, my WILB) will help versus the run.
Although I don't expect a pass, I will play a Cushion coverage off the line of scrimmage versus the eligible receivers just incase.
Swaps / Actions :
There will be instance you will want to change things up (ie : blitz a player, drop a lineman into coverage, stunt a DE and a DT to try and cause confusion, etc). You can accomplish this under the "Swaps / Actions" section.
In this example, lets say we want our WILB to blitz 20% of the time. When the WILB isn't blitzing, we want to bring the SOLB in on the rush and drop our DE into coverage 30% of the time. How would we accomplish that?
Under the "Stunts / Actions" section, select your WILB under Pos, select Blitz under Action, and select 20%- (colored pink) under Freq. (I'll explain the difference between 20%+ and 20%- in a minute)
Under the next box, choose SOLB, LDE, and 30%-
Under the next box, choose SOLB, RDE, and 30%-
What does 20%- mean? That means to perform the action (in this case, blitzing the WILB) 20% of the time. If you perform this, then perform no other actions after this one. If, however, the game does not perform this action (it won't 80% of the time), it can continue seeing if it will perform another "Stunt / Action." If, however, you still want to open the possibility for the other actions regardless of whether or not you blitz, you would select 20%+ (the uncolored one).
Why did we select both the SOLB to switch with the LDE and the RDE? If the SOLB is no lined up on the side of the LDE, then this swap will be ignored. In that case, it would move to the next "Swap / Action", which tells the SOLB to try and swap with the RDE instead.
Note : If you select 20%- in our example, the second action will actually only be performed 80% (the percent the blitz isn't called) * 30% = 24% (while the blitz will occur 20% of the time and no call will occur 100% - (20% + 24%) = 56% of the time). If you select 20%+, the second action will be called 30% of the time. The individual breakdown would be :
Blitz WILB + no other Action : = (20%) * (100% - 30%) = 14%
No Blitz + Secondary Action = (80%) * (30%) = 24%
Blitz WILB + Secondary Action = (20%) * (30%) = 6%
No Actions = (100% - 20%) * (100% * 30%) = 56%